Your User Management System
Hivekit allows a lot of flexibility in how you authorize connections to your realms. If you have a number of different users connecting to hivekit you can authenticate them individually and control their permissions via the token they use to log in.
Introduction
Authenticating a connection to Hivekit
Connections to hivekit are authenticated by providing a JWT token. This JWT token includes information about which user this connection is for, what their permissions are, and which organisation they belong to.
You can read more about the details of the token in the authentication guide.
The applications you create will need to get a suitable token to log into hivekit. To make it easy to get started, we provide a simple way of creating tokens, but if you have a number of different users with different permissions, or more complex requirements, you will want to issue your own tokens based on the users in your user management system.
Access Tokens
A hivekit access token looks like this:
eyJhbGciOiJIUzI1NiIsInR5cCI6IkpXVCIsImtpZCI6ImRQSnJQRG8xNHR5WGJyeEltSkthUCJ9.eyJzdWIiOiJqb2huZG9lLTEyMyIsInRuZCI6InJ4RjZ2aDVCNzl6eTNEdDhNVDEzMCIsImV4cCI6MTY4ODE1NjY4MywicGVyIjp7ImxvbmRvbiI6eyJkZWxpdmVyeVJpZGVycy8qIjoiUiIsImRlbGl2ZXJ5UmlkZXMvam9obmRvZS0xMjMiOiJDVSJ9fSwiZHB2Ijp7ImxvbmRvbiI6WyJkZWxpdmVyeVJpZGVzL2pvaG5kb2UtMTIzIl19LCJpYXQiOjE2ODU1NjQ4MjEsImlzcyI6InBsYXRmb3JtLmhpdmVraXQuaW8iLCJqdGkiOiJ4SXRiQ0tqeFBLdGxmQVV0MnVmUFUifQ.ZxBxyZZeUlwvLYuMuSy4XuLm1b3kuunrVdJGpJFM_sI
If you decode this token, you'll see a number of claims
{
  "sub": "johndoe-123",
  "tnd": "rxF6vh5B79zy3Dt8MT130",
  "exp": 1688156683,
  "per": {
    "london": {
      "deliveryRiders/*": "R",
      "deliveryRides/johndoe-123": "CU"
    }
  },
  "dpv": {
    "london": [
      "deliveryRides/johndoe-123"
    ]
  },
  "iat": 1685564821,
  "iss": "platform.hivekit.io",
  "jti": "xItbCKjxPKtlfAUt2ufPU"
}
This token was generated by the Access Management tool in hivekit, but you can create such tokens yourself. If you do, you'll need to provide at least
- the tnd claim with the tenant id that owns the realms this token will be used to access
- the iss of "platform.hivekit.io" to indicate that the token has been signed with a secret owned by hivekit
In addition, the header of the JWT contains a kid claim that matches the id of a secret stored within hivekit.
We also recommend that you include the following claims
- sub to indicate which user is accessing hivekit. If there is no specific user, then this claim can be omitted.
- exp to indicate when the token expires
- iat to indicate when the token was issued
- jti as a unique id for this token.
You can also include the per claim containing the permissions that this token carries, and the dpv claim if this token will be used as the canonical data provider for a specific object. This is useful when a client owns a specific object in the realm, and allows for the object to be automatically updated when the owning client disconnects.
When to use the hivekit Access Management tool
Hivekit access management allows the owner of an organisation (tenant) to manage secrets and tokens for their realms. This tool is all you need to get started quickly, and is all you will need if your authorization and authentication needs are simple, such as a small number of statically permissioned services.
Tokens prove their own validity, so once a token is issued, it is usually valid through to its expiry. Hivekit does periodically refresh its list of valid secrets, so it is possible to invalidate all tokens associated with a specific secret by removing that secret. If you think you may need to do this, you should segregate tokens to different secrets based on riskiness and liklihood of needing to forcibly invalidate them. When issuing a token, think carefully about when it should expire.
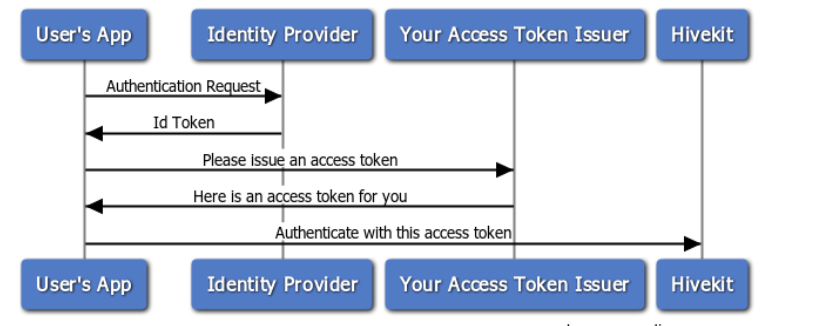
If you have more complex needs, a better solution is for you to control your users sign on, then issue short-lived tokens for those users as and when they are needed.
Example: Authenticating with Auth0 and passport.js
To take control of generating your own access tokens, you will need some code to issue the tokens, and you'll have to make sure that it can only be called by authenticated users. You can then use the tokens to connect to hivekit.
This example uses auth0 for authentication, along with express and node.js. It's based on the passport js tutorial with some tweaks.
Step 0: Gather the ingredients
Before getting started, take some time to gather the ingredients you'll need:
- A development environment that has node.js. You may want a way of managing your secrets too. I use direnv to control my environment variables stored in a .envrc file, which is not checked in to git. I store the host 'localhost' in an environment variable HOST and the port 3000 in the variable PORT.
- An auth0 account. The free account is fine for getting started
- An application created in Auth0. The 'Default App' works. If, like me, you run the example on localhost, port 3000 then you'll need to configure the Allowed Callback URLs to include http://localhost:3000/oauth2/redirect and the Allowed Logout URLs to include http://localhost:3000/.
- The Auth0 domain for your app. It's under Settings -> Basic Information. I store this in an environment variable AUTH0_DOMAIN
- The Auth0 client id. I store this in an environment variable AUTH0_CLIENT_ID
- The Auth0 client secret. I store this in an environment variable AUTH0_CLIENT_SECRET
- You need to have signed up for a Hivekit account.
- The Hivekit tenant id. You can find this in the 'Access Management' section. Store this in an environment variable HIVEKIT_TENANT_ID
- A Hivekit secret. You can create this in the 'Access Management' section, and then click 'show secret' Store this in an environment variable HIVEKIT_SECRET
- The matching Hivekit secret id. Store this in HIVEKIT_SECRET_ID
Step 1: Create a new node.js project
Create a folder for your new project, set it up and install the dependencies:
npm init -y
npm install connect-sqlite3 cors express express-session jsonwebtoken morgan nanoid passport passport-openidconnect
Since we're using ecmascript modules, we also need to add the following to our package.json file:
"type": "module",
Step 2: Set up the authentication routes and middleware
Create a file called auth.js and add the following code:
import passport from 'passport'
import OpenIDConnectStrategy from 'passport-openidconnect'
import express from "express"

passport.use(new OpenIDConnectStrategy({
    issuer: `https://${process.env['AUTH0_DOMAIN']}/`,
    authorizationURL: `https://${process.env['AUTH0_DOMAIN']}/authorize`,
    tokenURL: `https://${process.env['AUTH0_DOMAIN']}/oauth/token`,
    userInfoURL: `https://${process.env['AUTH0_DOMAIN']}/userinfo`,
    clientID: process.env['AUTH0_CLIENT_ID'],
    clientSecret: process.env['AUTH0_CLIENT_SECRET'],
    callbackURL: '/oauth2/redirect',
    scope: [ 'profile' ]
}, (issuer, profile, cb) => cb(null, profile)))
passport.serializeUser((user, cb) => process.nextTick(() => cb(null, { id: user.id, username: user.username, name: user.displayName })))
passport.deserializeUser((user, cb) => process.nextTick(() => cb(null, user)))

export const auth = express.Router();

auth.get('/login', passport.authenticate('openidconnect'))
auth.get('/oauth2/redirect', passport.authenticate('openidconnect', {
    successRedirect: '/',
    failureRedirect: '/login'
}))
auth.get('/logout', function(req, res){
    req.session.destroy()
    res.redirect('/')
})
This configures passport to use the openidconnect strategy to connect to Auth0. It also sets up the routes for login and logout.
Step 3: Set up the token issuer
Create a file called hivekit-access-token.js to hold the route that creates an access token for hivekit.
import express from "express"
import jwt from 'jsonwebtoken'
import { nanoid } from 'nanoid'

const payload = {
    tnd: process.env.HIVEKIT_TENANT_ID
}
const secret = Buffer.from(process.env.HIVEKIT_SECRET, 'base64')
const options = {
    issuer: "platform.hivekit.io",
    keyid: process.env.HIVEKIT_SECRET_ID,
    jwtid: nanoid(),
    expiresIn: "1 week"
}
export const token = express.Router()
token.use(express.json())
token.get('/', (req, res, _next) => {
    if (!req.isAuthenticated()) {
        res.status(401).json({ authenticated: false })
        return
    }

    const user = req.user
    const token = jwt.sign({
        sub: user.name,
        // permissions could be included here with a 'per' claim
        // data provider object linking could be included here with a 'dpv' claim
        ...payload
    }, secret, {
        jwtid: nanoid(),
        ...options
    })

    res.json({ authenticated: true, user, token })
})
This code creates a route that returns a jwt token that can be used to authenticate with hivekit. It uses the passport user object on the request to get the user name.
If you wanted to be able to kick users out easily, you could reduce the expiry time to something quite short, and periodically rerequest access tokens.
Step 4: Set up the express app and server
Create a file called index.js to hold the express app and server.
import http from 'http'
import { dirname, join } from 'path'
import { fileURLToPath } from 'url'
import express from 'express'
import morgan from 'morgan'
import connectSqlite3 from 'connect-sqlite3'
import session from 'express-session'
import passport from 'passport'
import {auth} from './auth.js'
import {token} from './hivekit-access-token.js'

const dir = dirname(fileURLToPath(import.meta.url))
const {HOST, PORT} = process.env

const app = express()
app.use(morgan('tiny'))
app.use(express.static(join(dir, 'public')))
const SQLiteStore = connectSqlite3(session)
app.use(session({
    secret: process.env['SESSION_SECRET'],
    resave: false,
    saveUninitialized: false,
    store: new SQLiteStore({ db: 'sessions.db', dir: join(dir, '..')})
}))
app.use(passport.authenticate('session'))
app.use(auth)
app.use('/hivekit-access-token', token)

const httpServer = http.createServer(app)
httpServer.listen(PORT, HOST, () => {
    console.info(`Server running http://${HOST}:${PORT}/`)
})
Step 5: Create a simple web page
Create a file called index.html in a folder called public. Add the following code:
<html lang="">
    <head>
        <title>hivekit</title>
    </head>
    <body>
        <h1>my first hivekit app</h1>

        <div>user id : <span id="user_id">unknown</span></div>
        <div>hivekit connection status : <span id="connection_status">unknown</span></div>
        <div>your realms : <span id="realm_list">unknown</span></div>

        <script type="module">
            import Hivekit from 'https://esm.run/@hivekit/client-js';

            const response = await fetch('/hivekit-access-token').then(r => r.json())

            if (response.authenticated) {
                const client = new Hivekit()
                document.getElementById('user_id').innerText = response.user.name
                client.on('connectionStatusChanged', () => {
                    document.getElementById('connection_status').innerText = client.connectionStatus
                })
                await client.connect('wss://api.hivekit.io/v1/ws')
                await client.authenticate(response.token)

                const realms = await client.realm.list()
                document.getElementById('realm_list').innerText = Object.values(realms).map(r => r.id).join(', ')
            } else {
                console.error('not authenticated')
                window.location.href = '/login'
            }
        </script>
    </body>
</html>
Step 6: Run the app
node index.js
You should see the following output:
Server running http://localhost:3000/
If you go to localhost:3000 in your browser, the page will detect that you are not logged in, so it will redirect you to the auth0 login page for your configured auth0 application. Once you have logged in, you will be redirected back to your app, and you should see something like the following:
my first hivekit app
user id : Adam
hivekit connection status : connected
your realms : 8eGJMsdv-BhKTSwcgVudB, g_HgNUS_-UjbStrGWIPjc
The user id and realm list will be different for you, but the connection status should be connected if everything has worked.
Congratulations, you've just created a hivekit app and integrated it with auth0!