Getting Started
Alright, time to get started with Hivekit. In this tutorial, we'll download and run the server locally, connect to it from NodeJS, create and update an object and an area and subscribe to changes.
Running the Server
Let's start by downloading the right Hivekit Server executable for your operating system from your license page.
The Hivekit Server is a fast and scalable server for realtime location and machine data. To try it out, shoot us an email to team@hivekit.io .
Unzip it and run it. That's it. Your server is now running on localhost:8090 for HTTP and WS. To make sure it does, open a browser and go to http://localhost:8090/admin.
Here, you can log in with the password CHANGE_ME - which - you guessed it - you should change in your server's conf.yml as soon as possible (and, of course, turn the admin dashboard off altogether for production deployments).
You should now see something like this.
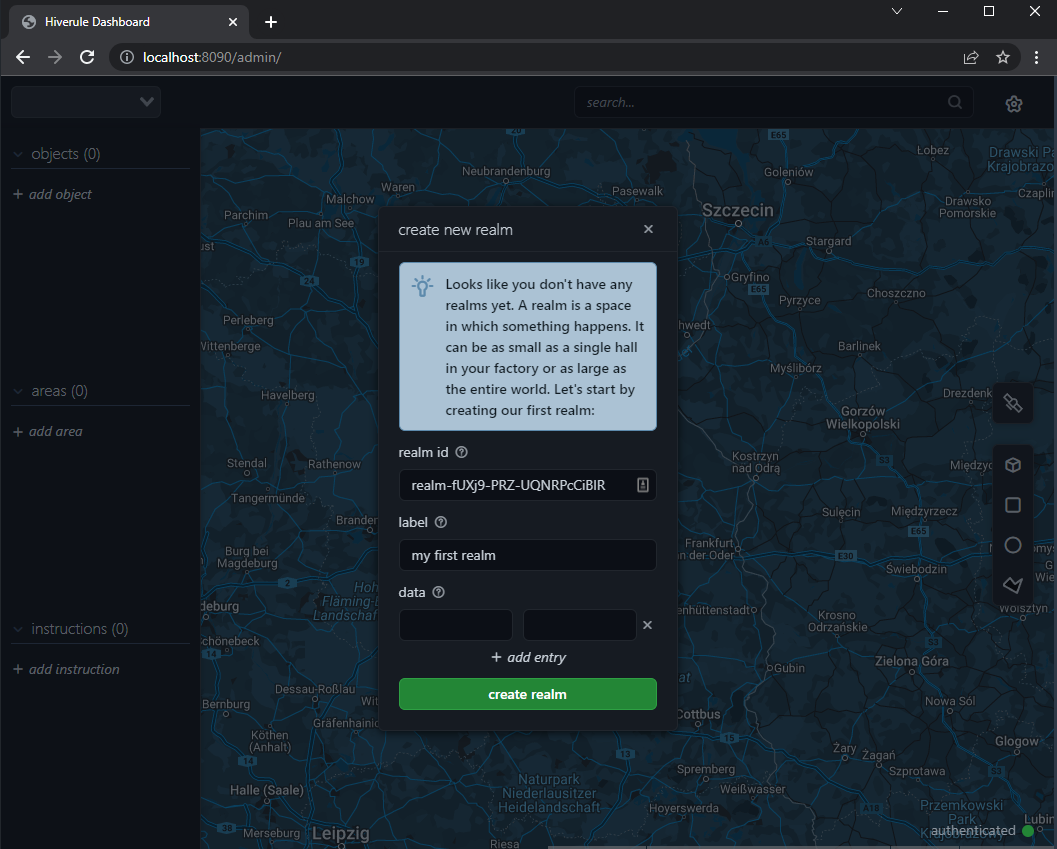
The dialog you see asks you to create a "realm". A realm is a space within which something happens. It can be as small as a single room or as large as the entire world. All other concepts, such as Objects, Areas, Instructions, Subscriptions, or Tasks, exist within the scope of a realm.
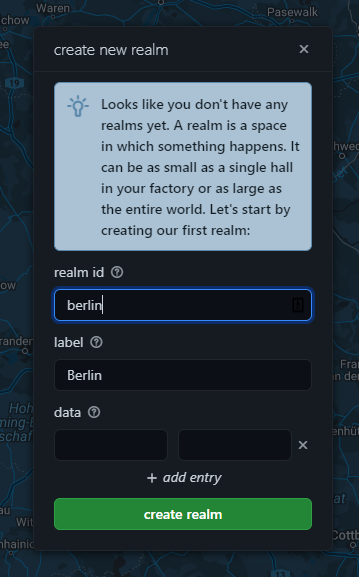
For this tutorial, you'll need a realm with the id berlin - so let's create one:
Connecting to the Server
For this part, we'll create a tiny NodeJS project. If you want to skip ahead you can also just clone the repository for this tutorial at https://github.com/hivekit/hivekit-tutorials-and-examples/tree/main/getting-started.
Alright, let's get the standard stuff out of the way. Create a new folder somewhere and run npm init in it. Hit Enter a lot. Once that's done, also add the line "type": "module", to your package.json so we can use the sexy new import syntax.
Now, let's install the hivekit client library. You can do so via npm or yarn by running:
#via npm
npm install --save @hivekit/client-js

#via yarn
yarn add @hivekit/client-js #yarn
Hivekit's authentication works via JSON Web Tokens (JWT). For this tutorial, we'll create one ourselves, so let's also add the jsonwebtoken package via npm install --save jsonwebtoken.
Next, create a file called index.js and import both libraries via:
import HivekitClient from "@hivekit/client-js";
import jwt from 'jsonwebtoken'
Initialize the client via:
const client = new HivekitClient();
In this initial state, the client is neither connected, nor authenticated. We need to do this explicitly. To know which connectionStatus the client is in, we can listen to the connectionStatusChanged event:
client.on('connectionStatusChanged', () => {
    console.log('client connection status is: ' + client.connectionStatus);
});
Let's start by connecting to our server's Websocket endpoint:
await client.connect('ws://localhost:8090/ws');
To authenticate, we need a JWT that's signed with the same secret that's configured in your server's conf.yml under authTokenSecret (though there are also other ways to authenticate). If you haven't changed it, it's still "CHANGE_ME" - so for simplicities sake, let's go with that.
// sub stands for "subject" and is the "claim" where you define which user this token is for
const token = jwt.sign({ sub: 'Johndoe' }, 'CHANGE_ME');
await client.authenticate(token);
Our client's connectionStatus should now be authenticated - which means we are ready to go.
Creating an Object
Objects, areas and most other concepts in Hivekit exists within a "realm". To get an instance of the berlin realm we've created in the admin dashboard previously, add:
const realm = await client.realm.get('berlin');
For this tutorial, we'll assume that we run a scooter rental in Berlin. In Hivekit, the scooter would be represented by an "object". Objects are meant to represent any entity in the physical world, e.g. a worker with a smartphone, a vehicle, a machine or a sensor.
Each object can have the following properties:
- an
idthat is unique for this object within the realm - a
labelthat describes the object - a
locationthat can be as simple as latitude and longitude coordinates or can encompass additional information like altitude, heading, speed, precision, etc. - a map of arbitrary
data- e.g., the charge of an e-scooter, the value reading of a sensor, or the phone number of a delivery driver - a (read only)
connectionStatus, telling you if the object is receiving regular updates
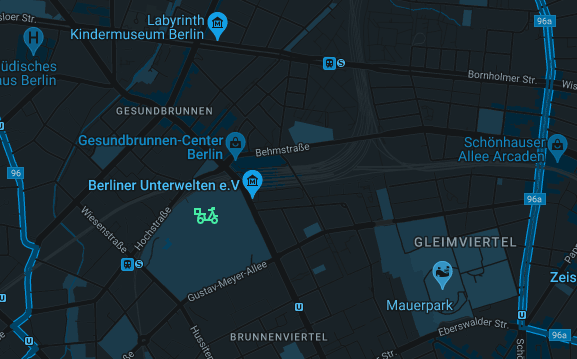
To create a scooter with the ID a14 we'll add:
await realm.object.create('scooter/a14', {
    label: 'Scooter A14',
    location: {
        latitude: 52.524177684357596,
        longitude: 13.384164394801328
    },
    data: {
        // this scooter's battery has 50% charge
        charge: 0.5,

        // data properties starting with $hkt for "hivekit" tell the admin dashboard how do display things
        $hkt_icon: {
            color: "#46eca4",
            category: "transportation",
            filename: "motorcycle-delivery-single-box.svg"
        }
    }
});
On your admin dashboard, you should now see a tiny scooter icon:
Very nice - but let's make the scooter move. To do this, we'll run an update every 500ms that moves it a little bit further north.
var lat = 52.524; // initial latitude
setInterval(async () => {
    lat += 0.001; // we'll move it by 0.001 north
    await realm.object.update('scooter/a14', {
        location: {
            latitude: lat,
            longitude: 13.385
        }
    })
}, 500); // every half second
Subscribing to changes
Switching back to the admin dashboard, you should now see your scooter move. The admin dashboard is notified of changes by using a subscription. Here's how this works:
const subscription = await realm.object.subscribe();
subscription.on('update', data => {
    console.log('got object updates', data);
});
Using realm.object.subscribe() without any parameters subscribes to all object updates within a realm. For real world applications we would want to be more specific about what updates we're interested in using subscription options.
Creating an Area
Let's round things up by creating an area. Areas can be circles, rectangles or polygons and help you break down subscriptions or define rules related to spaces in the real world. Let's create a polygonal area within our Berlin realm that shows where Alexanderplatz is:
realm.area.create('alexanderplatz', {
    label: 'Alexanderplatz',
    shape: {
        points: [
            { x: 13.405068, y: 52.519991 },
            { x: 13.408768, y: 52.521836 },
            { x: 13.412211, y: 52.523811 },
            { x: 13.416132, y: 52.52199 },
            { x: 13.414398, y: 52.520547 },
            { x: 13.41072, y: 52.518546 },
            { x: 13.408913, y: 52.517068 }
        ]
    },
    data: {
        // tell the admin dashboard to show this area in purple
        $hkt_color: '#c546ec'
    }
});
Creating an Instruction
Finally, let's automate something. Unfortunately, our one scooter and area doesn't give us much to play with - but nevermind. Let's create a simple instruction that makes the area change color, based on whether the scooter is in it or no.
realm.instruction.create('highligh-area-with-scooter', {
    label: 'Changes an areas color to green if there is at least one scooter in it',
    instructionString: `
    when
        area().containing(type=scooter)
    then
        set($hkt_color, \\#62ec46)
    until
        set($hkt_color, \\#c546ec)
    `
})
You can try this out by moving the scooter in and out of the area in the admin dashboard. If you place the scooter on Alexanderplatz AND HIT SAVE you should see the area change color.
What's next?
This concludes this getting started tutorial. But there is a lot more to Hivekit. For a more in depth introduction to its functionality, head over to our Core Concepts Guide.