Using the Websocket API
Hivekit comes with SDKs and a well structured REST API that makes it easy to integrate with our platform. But, there are cases where it makes sense to use Hivekit's protocol and its WebSocket API directly - especially if there is no client SDK for your language of choice and you require realtime update feeds - or, if you wish to create a custom client for Hivekit.
You can watch this tutorial as a video - or, if you prefer, keep reading for the text version.
Concepts
Before we start, let's quickly review the two concepts we'll be working with.
-
A realm is a space within which something happens, e.g. a city or a building. Realms serve as containers for all other concepts - your vehicles, areas, instructions and tasks all live within the scope of a realm.
-
An object is a physical or virtual entity that can be tracked and managed. This could be a vehicle, a person, a sensor, a package, a building, a piece of equipment, or anything else you want to keep track of. Objects have a location and optional data.
Protocol
Hivekit uses a custom, JSON based message format to communicate via WebSockets, TCP and other connection types. Each message consists of an array of "actions". An action relates to a certain realm and type (e.g. "object", "area" etc) and a specific action (e.g. "create", "list", "read", "update" etc). Here's what that looks like:
[{// create an object
  typ: 'obj', // type == object
  act: 'cre', // action == create
  id: 'rider/SadeIbrahim', // object id
  rea: 'lagos', // realm id
  loc: { lon: 3.37590, lat: 6.51309 } // location
}, {
    // read that same object
    typ: 'obj', // type == object
    act: 'rea', // action == rea
    id: 'rider/SadeIbrahim', // object id
    rea: 'lagos', // realm id
}]
As you can see, the fieldnames and some of the field values are abbreviated as three letter short codes. This helps to keep the message size small and the protocol efficient. You can find a full list of these codes here.
What we want to do
In this tutorial, we'll
- sign in to Hivekit
- connect to the Hivekit WebSocket API
- authenticate the Websocket connection as soon as its open
- create a new object
- check that object on a map
- subscribe to updates
- update the object on the map and see the updates come in via the subscription
Step 1: Sign in to Hivekit
Start by logging into your Hivekit account. If you don't have an account yet, you can sign up for free at https://hivekit.io/signup/.
When you first sign up, Hivekit will automatically create an initial realm and an open access token.
Step 2: Find the message structure for an Object creation
We maintain a list of actions and related responses in our protocol docs. Here you can find the documentation for an object create action.
Step 3: Gather the necessary information
We need to gather the following information:
- The API Endpoint URL to connect to
- The Realm ID
- The Access Token
- The Object ID
The API Endpoint URL to connect to
We can find this URL on the connectivity page. It's wss://api.hivekit.io/v1/ws.
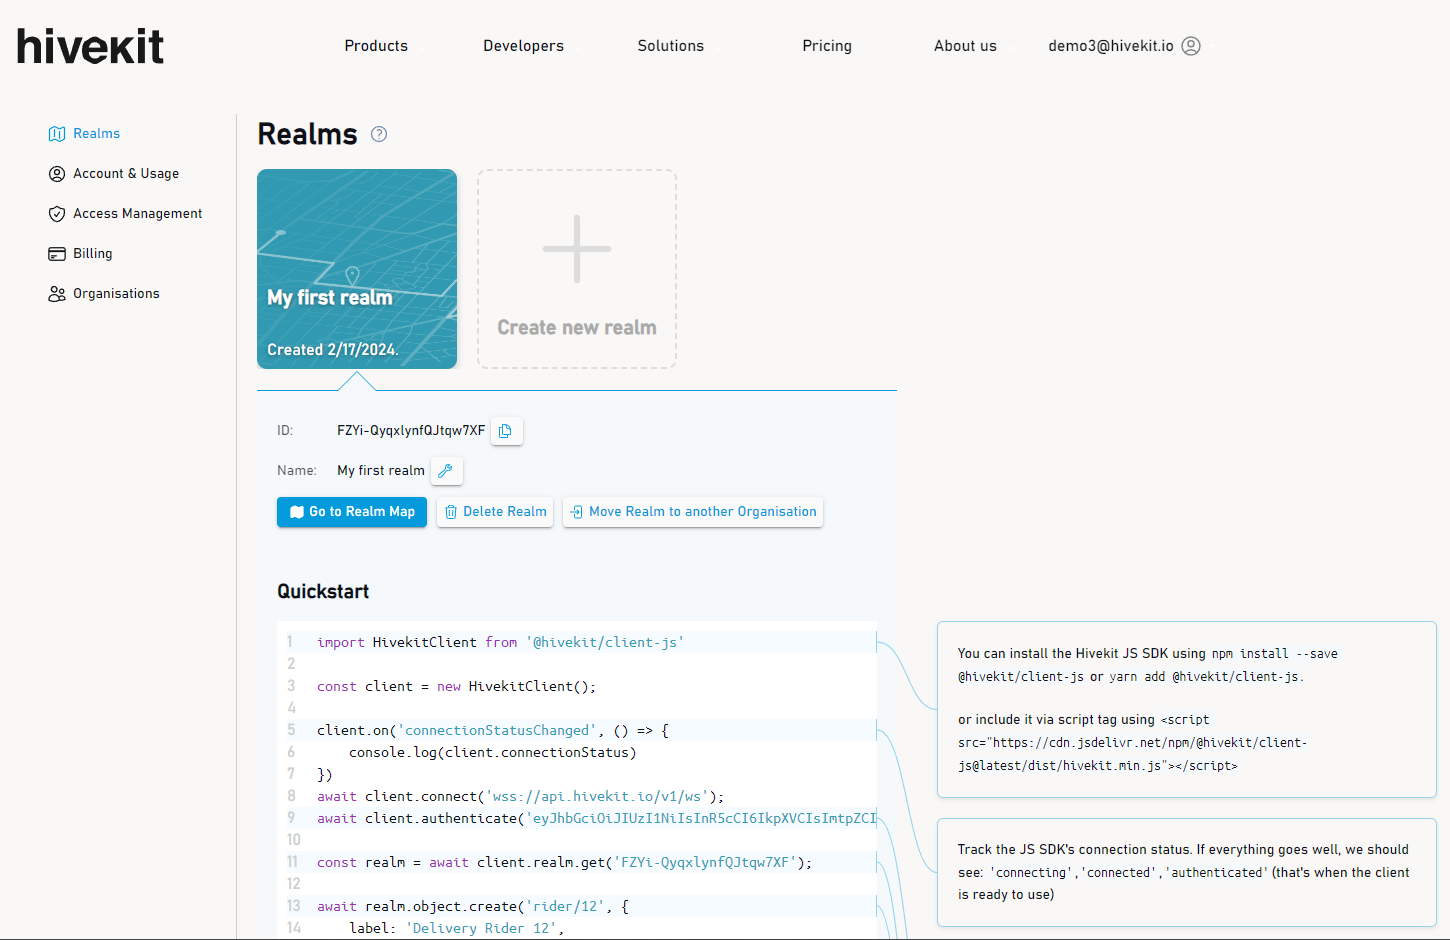
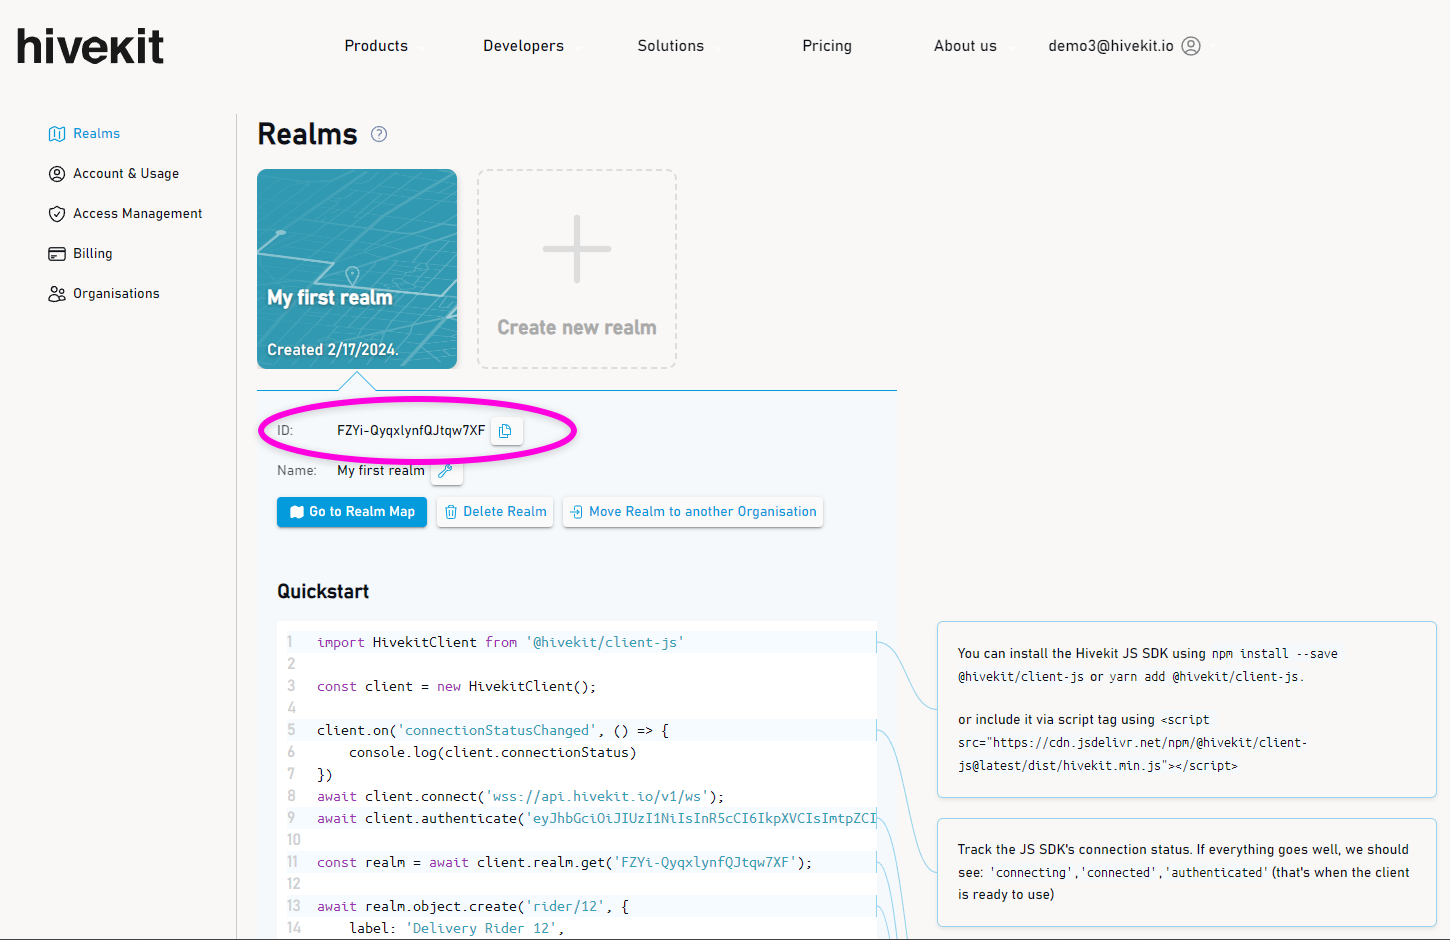
The Realm ID
The realm ID can be found on the Hivekit dashboard, just below the selected realm:
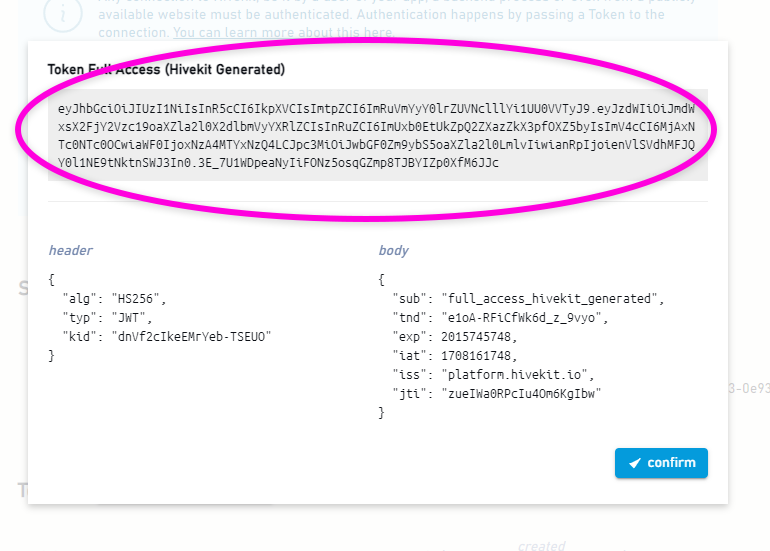
The Access Token
The access token can be found in the "Access Management" section of the Hivekit dashboard.
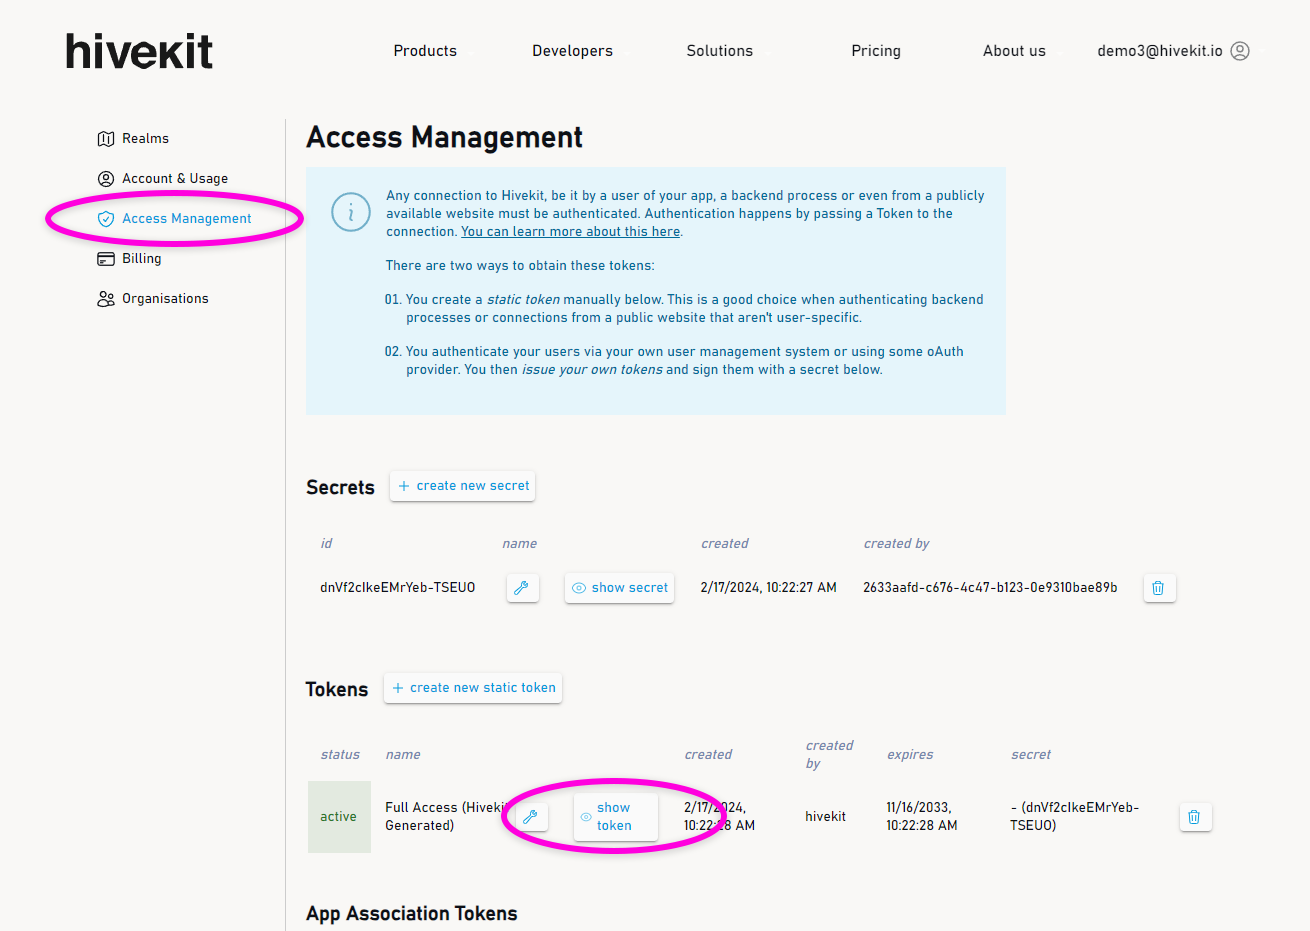
You can display it and copy its value by clicking "show token".
The Object ID
The object id is something we need to generate when creating the object. You can either use an existing id, e.g. a license plate number for a vehicle or come up with your own. Object IDs allow you to identify an object throughout its lifecycle. For this tutorial, we'll create a randon id, using the nanoid library.
Step 4: Connect and Authenticate
We'll be using NodeJS and the ws library for this example, but it works just the same with any other language or Websocket implementation. Once your connection is established, the very first message needs to be Bearer <YOUR-TOKEN>. If you send anything else, the server will close the connection.
import WebSocket from 'ws';
import { nanoid } from 'nanoid';

const url = 'wss://api.hivekit.io/v1/ws';
const token = 'YOUR_TOKEN';
const realmId = 'YOUR_REALM_ID';
const objId = 'Object-' + nanoid();

const ws = new WebSocket(url);

ws.on('open', () => {
    ws.send('Bearer ' + token);
});

ws.on('message', (data) => {
    console.log('Received: ', data);
});
If you run this code, you should receive the following message from the server:
[
  {
    typ: 'sys', // type = system
    act: 'aut', // action = authentication
    res: 'suc', // result = success
    dat: { // details about the server you're connected to
        version: '1.3.2',
        buildDate: 'Fri Feb 16 17:15:33 UTC 2024' }
  }
]
Step 5: Process incoming messages
Once we've received this message, we know that our connection was succesfully authenticated and that we can start sending our own messages. So, let's extend our 'message' callback to parse the incoming messages and act on them.
ws.on('message', (data) => {
    // data is a JSON array of objects, each object is a message from the server
    const messages = JSON.parse(data);

    messages.forEach(msg => {
        // If this message is a System Authentication Success message, we can start sending our own messages
        if (msg.typ === 'sys' && msg.act === 'aut' && msg.res === 'suc') {
            init();
        // If we don't have a registered callback for this message, we'll log it
        } else {
            console.log('Unhandled message', msg);
        }
    })
});
Step 6: Request - Response Communication
Most actions, such as creating, updating, listing, reading or deleting require request-response communication. To facilitate that over Websocket, Hivekit uses a correlation id. This is a random string that we generate on the client and send with our request. The server will then include this correlation id in its response, so we can map the response to the request. Here's how we can implement this in our code:
const callbacks = {};

// Send a message to the server
function send(msg, callback) {
    // We'll create a random correlation id to map the response to the request
    const correlationId = nanoid();
    // We'll add the correlation id to the message
    msg.cid = correlationId;
    // We'll store the callback to invoke it when we receive a message with this correlation id
    callbacks[correlationId] = callback;
    // We'll send the message to the server. Notice the array around the message, this is the format the server expects
    ws.send(JSON.stringify([msg]));
}

// A wrapper function that let's us use send as an async function
function sendAndAwaitResponse(msg) {
    return new Promise((resolve, reject) => {
        send(msg, resolve);
    });
}
We then extend our on-message callback to invoke the registered callback when we receive a message with the correlation id:
//...
// If we have a registered callback for this message, we'll invoke it
else if (msg.cid && callbacks[msg.cid]) {
    callbacks[msg.cid](msg);
    delete callbacks[msg.cid];
}
Step 7: Create an object
Phew - that was a lot of setup. But now, it's finally time to create our object. We'll create the init function that our code calls as soon as the connection is authenticated and use the sendAndAwaitResponse function we just created to send a message to the server and wait for the response. Here's how we can do that:
async function init() {
    // Create an object
    let result = await sendAndAwaitResponse({
        typ: 'obj', // type = object
        act: 'cre', // action = create
        id: objId, // our object id
        rea: realmId, // our realm id
        lab: 'Object A', // label
        loc: { lon: 13.404954, lat: 52.520008 }, // location
        dat: { type: 'scooter', charge: 0.5 }, // data
    });
    console.log('Create Object: ', result);
}
The server will respond to that with a message like
[
  {
    id: 'object-DpV4jVAmcGDkb2cQr73YR',
    cid: 'AUeaiQQYZEQgwT-H1l0s4',
    res: 'suc'
  }
]
which will be processed by our message function and forwarded to the correct callback.
Step 8: Check the object on a map
Let's check if our object really exists. We can do this by visiting the Realms section of the Hivekit dashboard and clicking on "Go to Realm Map". Here, we should find our new object on the category tree on the left - as well as on the map itself. When we click on the object, we should see its label, location and data.

Step 9: Read the object
Reading the object is almost the same as creating it. We simple change the action in our request to 'rea' and remove the lab, loc and dat fields. Here's what that looks like:
 // Read the object
result = await sendAndAwaitResponse({
    typ: 'obj',
    act: 'rea',
    id: objId,
    rea: realmId,
});
console.log('Read Object: ', result);
The resulting output should be:
[{
  id: 'object-DpV4jVAmcGDkb2cQr73YR', // object id
  cid: 'wLX7LuzLa1JnVvhKinW2R', // correlation id
  res: 'suc', // result = success
  dat: { // response data
    cst: 'dis', // connection state, see https://hivekit.io/guides/core/presence
    dat: { charge: 0.5, type: 'scooter' }, // data
    lab: 'Object A', // label
    loc: {
      acc: 0, // accuracy
      alc: 0, // altitude accuracy
      alt: 0, // altitude
      gcs: '', // geospatial coordinate system (empty for lat/lon)
      hea: 0, // heading
      lat: 52.520008, // latitude
      lon: 13.404954, // longitude
      spe: 0, // speed in m/s
      tim: '2024-02-20T11:01:13.816689183Z' // time this location was recorded in UTC
    }
  }
}]
Step 10: Subscribing to updates
Finally, we want to get a realtime feed of any change to any object within our realm. For that, we need to create a subscription. Hivekit's subscriptions have a lot of options and settings and let you e.g. subscribe to areas, instructions, a single object and its tasks, objects within a certain area or within a radius around another moving object or objects with certain criteria, e.g. a charge below 20%. But for now, let's keep things simple and just subscribe to all objects within our realm.
We create a subscription by sending the following message:
// Create a subscription
result = await sendAndAwaitResponse({
    typ: 'sub', // type = subscription
    act: 'cre', // action = create
    id: subscriptionId, // our subscription id
    rea: realmId, // our realm id
    dat: { // subscription data
        sty: 'rea', // scope type = realm - we want to subscribe to all objects within our realm
        sid: realmId, // scope id - the id of whatever the scope type is, in this case, the realm id
        typ: 'obj' // type = object - the type of entity we want to subscribe to
    }
});
To test our subscription, we head back to our realm map and move the object around a bit. As soon as we hit save our subscription should receive the following kind of message:
{
  "typ": "sub", // type = subscription
  "id": "sub-PxIHYszBfDDooN5FHpw-e", // subscription id
  "uty": "dta", // update type = delta. This could also be "ful" for full updates
  "seq": 1, // sequence number, should increment with each update
  "obj": { // objects that changed
    "cre": { // created means, that you need to add these object to your local state of objects
      "object-zdC1zrUv0sK3tqL-Kefod": {
        "lab": "Object A",
        "loc": {/**...**/},
        "dat": {/**...**/},
        "cst": "dis"
      }
    }
  }
}
To understand this message, it's important to understand the way subscriptions work in Hivekit. Subscriptions assume that you keep a local copy of the state of your subscription and Hivekit provides you with updates containing the changes to that subscription. So each subscription message will contain lists of objects to be added to your local state (cre), updated in your local state (upd) and removed from your local state (del). This way, you can keep your local state in sync with the server's state.
If you add "exe": true (executeImmediatly = true) to your subscription message, Hivekit will start by sending you the full state of the subscription when you create it, expressed as a message with "uty":"ful" (update type = full). This is useful if you're just starting your client and need to know the current state of the world.
Step 11: Handle subscription messages.
Each incoming message contains the subscription id it belongs to. To route updates, it makes sense to store another callback upon subscribing and to route messages to it based on the subscription id. Here's how we can do that:
// We'll create a random id for our subscription
const subscriptionId = 'sub-' + nanoid();
const subscriptionCallbacks = {};

// Register a callback for incoming subscription updates upon subscribing
subscriptionCallbacks[subscriptionId] = update => {
    console.log('Subscription Update: ', JSON.stringify(update, null, 2));
}

// Add this to the message function
// If this message is a subscription update, we'll invoke the registered callback
} else if (msg.typ === 'sub' && subscriptionCallbacks[msg.id]) {
    subscriptionCallbacks[msg.id](msg);
}
That's it.
Phew - that was complicated. Thanks for sticking with me to the end. If you want to go deeper on this, I can recommend reading up on the protocol and to look at Hivekit's JavaScript SDK as a reference implementation.
If you have any questions, feel free to ask in the Hivekit Discord Chat or Contact us via email..
Here's the full code for this example:
import WebSocket from 'ws';
import { nanoid } from 'nanoid';

// These are maps with id => callback, so we can invoke the callback when we receive a message with that id
const callbacks = {};
const subscriptionCallbacks = {};

// The URL of the HiveKit API, you can find it at https://hivekit.io/guides/core/connecting
const url = 'wss://api.hivekit.io/v1/ws';

// Your API token, you can find it or create new ones at https://hivekit.io/account/#/access-management
const token = 'YOUR_TOKEN';

// Your realm id, you can find it at https://hivekit.io/account/#/realms
const realmId = 'YOUR_REALM_ID';

// We'll create a random id for our object
const objId = 'Object-' + nanoid();

// We'll create a random id for our subscription
const subscriptionId = 'sub-' + nanoid();

// Create a new WebSocket connection
const ws = new WebSocket(url);

ws.on('open', () => {
    // As soon as the Websocket connection is open, we'll send our token preceded by 'Bearer '
    // If you send anything else, the server will close the connection
    ws.send('Bearer ' + token);
});

ws.on('message', (data) => {
    // data is a JSON array of objects, each object is a message from the server
    const messages = JSON.parse(data);

    messages.forEach(msg => {
        // If this message is a System Authentication Success message, we can start sending our own messages
        if (msg.typ === 'sys' && msg.act === 'aut' && msg.res === 'suc') {
            init();

        // If we have a registered callback for this message, we'll invoke it
        } else if (msg.cid && callbacks[msg.cid]) {
            callbacks[msg.cid](msg);
            delete callbacks[msg.cid];

        // If this message is a subscription update, we'll invoke the registered callback
        } else if (msg.typ === 'sub' && subscriptionCallbacks[msg.id]) {
            subscriptionCallbacks[msg.id](msg);

        // If we don't have a registered callback for this message, we'll log it
        } else {
            console.log('Unhandled message', msg);
        }
    })
});

async function init() {
    // Create an object
    let result = await sendAndAwaitResponse({
        typ: 'obj', // type = object
        act: 'cre', // action = create
        id: objId, // our object id
        rea: realmId, // our realm id
        lab: 'Object A', // label
        loc: { lon: 13.404954, lat: 52.520008 }, // location
        dat: { type: 'scooter', charge: 0.5 }, // data
    });
    console.log('Create Object: ', result);

    // Read the object
    result = await sendAndAwaitResponse({
        typ: 'obj',
        act: 'rea',
        id: objId,
        rea: realmId,
    });
    console.log('Read Object: ', result);

    // Register a callback for incoming subscription updates
    subscriptionCallbacks[subscriptionId] = update => {
        console.log('Subscription Update: ', JSON.stringify(update, null, 2));
    }

    // Create a subscription
    result = await sendAndAwaitResponse({
        typ: 'sub',
        act: 'cre',
        id: subscriptionId,
        rea: realmId,
        dat: {
            sid: realmId,
            sty: 'rea',
            typ: 'obj'
        }
    });
    console.log('Create Subscription: ', result)
}

// Send a message to the server
function send(msg, callback) {
    // We'll create a random correlation id to map the response to the request
    const correlationId = nanoid();
    // We'll add the correlation id to the message
    msg.cid = correlationId;
    // We'll store the callback to invoke it when we receive a message with this correlation id
    callbacks[correlationId] = callback;
    // We'll send the message to the server. Notice the array around the message, this is the format the server expects
    ws.send(JSON.stringify([msg]));
}

// A wrapper function that let's us use send as an async function
function sendAndAwaitResponse(msg) {
    return new Promise((resolve, reject) => {
        send(msg, resolve);
    });
}